How to Add Keyframes in CapCut A Beginner-to-Pro Guide
Learn how to add keyframes in CapCut to create smooth animations, zoom effects, and professional video edits for TikTok, Reels, and YouTube Shorts.
The popularity of short-form video content has revolutionized the way creators can develop on platforms such as TikTok, Instagram Reels, and YouTube Shorts. It’s no longer sufficient to cut something or simply add static clips to make it pop. Now audiences demand seamless cuts, lively movement and a professional quality picture.
That’s where Keyframes are necessary. If you ever wanted to know how creators can make the video zoom in and out in CapCut or move text and text elements or use cinematic motion effects without any unwanted jitters, you have just landed in the right place as keyframes are your answer.
In this tutorial, you will learn how to add keyframes in CapCut, how they work, and how to utilize them to enhance your videos’ overall appearance and appeal.
What Are Keyframes in CapCut?
Keyframes in CapCut are markers that define the start and end points of any animation or movement in your video.
In simple terms:
- One keyframe = starting point of movement
- Another keyframe = ending point of movement
CapCut automatically fills the motion between these points, creating smooth animation without manual frame-by-frame editing.
For example:
- You set a keyframe for a small zoomed-out image
- Then move forward and set another keyframe with a zoomed-in version
- CapCut smoothly animates the zoom effect for you
This makes keyframes one of the most powerful tools in video editing.
Why Use Keyframes in Video Editing?
Keyframes are not just a feature, they are a creative control system. They allow you to turn simple clips into engaging visual stories.
Here’s why they matter:
1. Smooth Animations
Keyframes help you create natural motion like zoom in, zoom out, or sliding effects.
2. Professional Video Quality
Even simple clips start looking cinematic when motion is added properly.
3. Better Audience Engagement
Moving visuals keep viewers watching longer, which improves retention on social platforms.
4. Full Creative Control
You decide exactly when and how movement happens in your video.
Explore more here: Free Fire CapCut Template
How to Add Keyframes in CapCut (Mobile Step-by-Step)
Adding keyframes in CapCut mobile is simple once you understand the flow.
1. Import Your Video
Open the CapCut app and create a new project. Import the video clip you want to edit. This will be your base layer where all animations will happen.
2. Select the Clip
Tap on the video in the timeline to highlight it. Make sure it is selected before adding any effects or keyframes.
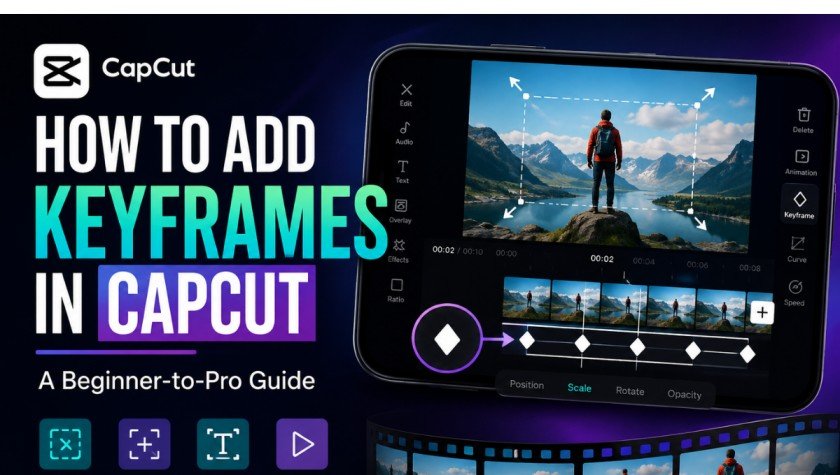
3. Add Your First Keyframe
Move the timeline cursor to the starting point of your animation. Look for the small diamond icon that is the keyframe button. Tap it to set your first keyframe.
This locks your current position, scale, or rotation.
4. Move Forward and Adjust Motion
Now move forward in the timeline. Change the position of your video, zoom level, or rotation angle depending on the effect you want.
CapCut will automatically create a second keyframe.
5. Add More Keyframes if Needed
For more complex animations, repeat the process. Each new adjustment creates a smooth motion path between frames.
6. Preview Your Video
Play your video to check the animation. If the movement feels too fast or uneven, adjust the spacing between keyframes.
How to Use Keyframes in CapCut PC
CapCut PC works on the same concept but offers more precision.
- Import your video into the timeline
- Select the clip layer
- Click the diamond keyframe icon
- Adjust position, scale, or rotation over time
The main difference is control. On PC, you can fine-tune movements more accurately using a mouse and larger timeline view, making it ideal for advanced editing.
Advanced Keyframe Techniques (Pro-Level Editing)
Once you understand the basics, you can unlock powerful editing styles using keyframes.
1. Smooth Zoom In/Out Effect
Create cinematic zoom effects by gradually increasing or decreasing scale using multiple keyframes.
2. Text Animation
Instead of static text, animate it using keyframes to move, fade, or scale smoothly into the frame.
3. Cinematic Motion Tracking
Follow an object in the video by adjusting position keyframes across the timeline.
4. Parallax Background Effect
Move background layers separately from foreground objects to create depth in your video.
5. Beat-Synced Movement
Match keyframe changes with music beats for more engaging edits.
Common Mistakes Beginners Make
Even though keyframes are simple, beginners often make these mistakes:
1. Using Too Many Keyframes
Overloading a clip with keyframes can make motion look unnatural.
2. Incorrect Timing
Poor spacing between keyframes leads to jerky or rushed animations.
3. Ignoring Smooth Flow
Not previewing results often results in uneven motion.
4. Over-Editing
Too many effects can distract viewers instead of engaging them.
Pro Tips for Better Keyframe Editing
If you want your videos to stand out, follow these tips:
- Keep movements slow and smooth for a cinematic feel
- Use fewer keyframes for cleaner animation
- Combine keyframes with transitions for better flow
- Always match animations with background music beats
- Test different motion styles before final export
When to Use Keyframes in CapCut
Keyframes are useful in almost every type of video content:
- Travel vlogs
- TikTok short videos
- Instagram reels
- YouTube intros and outros
- Product promotional videos
Whenever you need movement or animation, keyframes are the answer.
Conclusion
Keyframes are one of the major features in CapCut that every video creator ought to use. They provide you ultimate control over movement, timing and animation within your cuts.
With the right basic understanding of how to use them correctly, even the simplest videos can appear professional, dynamic and eye-catching.
It’s all about practice. Begin with simple zooms and gradually proceed to more sophisticated features such as motion tracking and cinematic transitions. As time goes on, the keyframe will be your most important tool in the editing process of CapCut.