How to Use Green Screen on CapCut Step-by-Step Guide
Learn how to use the green screen in CapCut with easy steps. Create professional videos by removing backgrounds and adding custom visuals quickly.
One of the most popular methods used for creating short videos that are engaging is using green screen effects. It enables content creators to replace background images with any other image or video, enhancing the visual appeal and professionalism of their content. CapCut’s chroma key functionality allows you to get rid of a green background and substitute it with a creative image or video in a simple manner.
Not only will you learn how to do it, but you will also learn some tips to get clean and realistic results, common problems, and the correct settings to achieve a clean and realistic image.
What is the Green Screen in CapCut?
Green screen (also known as chroma key) is a video editing effect in which a chosen colour backdrop (typically green) is removed from the videotape and substituted with a different colour backdrop.
In CapCut, this feature helps you:
- Remove green backgrounds automatically
- Add custom images or videos as backgrounds
- Create cinematic or creative effects for social media content
This is widely used in TikTok videos, YouTube Shorts, and reels to make content more engaging.
Step-by-Step Guide to Use Green Screen in CapCut
Step 1: Start a New Project
Open the app CapCut and click on ‘New Project.’ Choose the video with a green background. After being imported, it will be visible on your timeline to edit.
Always pay attention to the lighting of your original video as uneven lighting can have an impact on the final video.
Step 2: Add Your Background First
Before applying any effects, add your desired background image or video to the timeline.
Place it below your main green screen clip. This layering setup ensures smooth editing and better control over the final output.
Step 3: Select the Green Screen Clip
Tap on the video layer that contains the green background. This will open the editing options at the bottom of the screen.
From here, you can access advanced tools like chroma key.
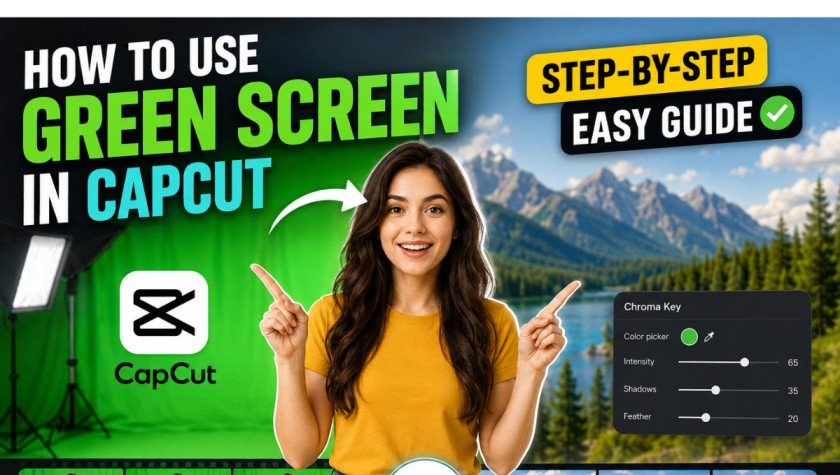
Step 4: Apply Chroma Key Tool
Select the “Chroma Key” option from the menu. Use the color picker tool to select the green color in your video.
Once selected, CapCut will automatically start removing the green background.
Step 5: Adjust Intensity and Shadows
After removing the background, fine-tune the result using the available settings.
Adjust:
- Intensity: Controls how much green is removed
- Shadows: Helps make edges smooth and natural
- Edge softness: Blends subject with background
Proper adjustment is important to avoid a fake or cutout look.
Explore more here: How to Blur Video Background in CapCut
Best Settings for a Perfect Green Screen Effect
To get professional results, use the following approach:
- Keep intensity moderate to avoid over-removal
- Adjust shadows carefully for natural blending
- Avoid harsh edges by slightly increasing feathering
- Use high-quality background images or videos
Common Mistakes to Avoid
Many beginners face issues because of simple mistakes. Avoid the following:
- Using poor or uneven lighting
- Wrinkled or shadowed green screen background
- Overusing chroma key intensity
- Placing subject too close to background
- Ignoring edge smoothing settings
Fixing these issues significantly improves video quality.
Pro Tips for Better Results
If you want your videos to look more professional:
- Use soft and even lighting on the green screen
- Keep distance between subject and background
- Use high-resolution background clips
- Match background motion with subject movement
- Avoid fast camera shakes during recording
Best Use Cases of Green Screen in CapCut
You can use green screen effects for:
- TikTok and Instagram reels
- YouTube tutorial videos
- Gaming content overlays
- Travel illusion videos
- Meme and entertainment content
Troubleshooting Common Issues
If your green screen is not working properly:
- Check if lighting is uneven
- Reduce chroma key intensity
- Reposition or re-import the clip
- Adjust edge smoothing settings
- Ensure background color is pure green
Export Settings for High Quality Video
Before exporting your final video, use these settings:
- Resolution: 1080p or 4K
- Frame rate: 30fps or 60fps
- Format: MP4 recommended
- Use high bitrate for better clarity
Conclusion
CapCut’s green screen feature is a great tool for both novice and expert editors. If you take the time to make adjustments to the lighting and chroma key settings and carefully select your footage, you’ll be able to create a professional video.
It is more than following a sequence of steps, it’s knowing how each setting will impact the final result. After you master it, you will be able to easily make highly engaging and viral-ready videos.